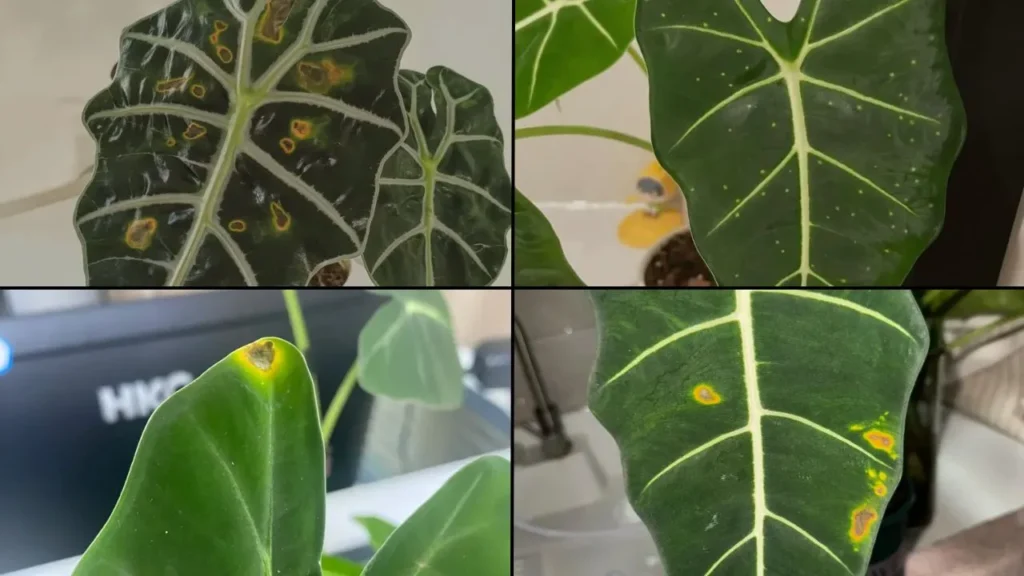
The first time I noticed spots on an Alocasia leaf, my reaction was pure panic. I took photos, zoomed in on every mark, and started searching for answers immediately. Overwatering? Sunburn? A disease I had never heard of? I assumed something was seriously wrong — and that I needed to fix it fast.
My biggest mistake back then was treating all spots as the same problem. I sprayed fungicide without knowing if a fungus was actually involved. I stopped watering completely, worried about root rot. At one point, I even considered cutting the entire leaf, afraid the damage would spread overnight.
What I didn’t understand yet was that Alocasia leaves don’t spot for just one reason. Some marks are caused by pests. Others are triggered by environmental stress. And yes, some really are fungal diseases — but they don’t behave the same way, and they shouldn’t be treated the same way either.
It took more than one damaged leaf for me to learn this, but it completely changed how I look at plant problems.
Not every spot on an Alocasia leaf means the same thing — and treating them the same way often makes things worse.
That realization is the reason this guide exists. Before reaching for sprays or scissors, I learned to slow down, look closely, and figure out what kind of spot I was actually dealing with.
Before Anything Else: I Stopped Asking “What’s Wrong?”
After a few false alarms and a lot of unnecessary treatments, I realized that asking “What’s wrong with my Alocasia?” wasn’t actually helping. That question made me rush to conclusions. What helped was slowing down and asking better questions.
Instead of guessing, I now walk myself through the same three checks every time I see a spot. This simple shift stopped me from spraying, cutting, or repotting blindly.
1. What does the spot actually look like?
I stopped focusing on color alone and started paying attention to shape, size, and texture.
Is it a tiny dot or a larger patch?
Does it have a defined edge, a yellow halo, or a rough, scar-like surface?
Is the leaf tissue sunken, dry, or still firm?
Once I trained myself to really look instead of react, many answers became obvious. Some spots looked scraped, almost metallic. Others had a dead center with a clear ring around it. These details matter far more than whether the spot is “yellow” or “brown.”
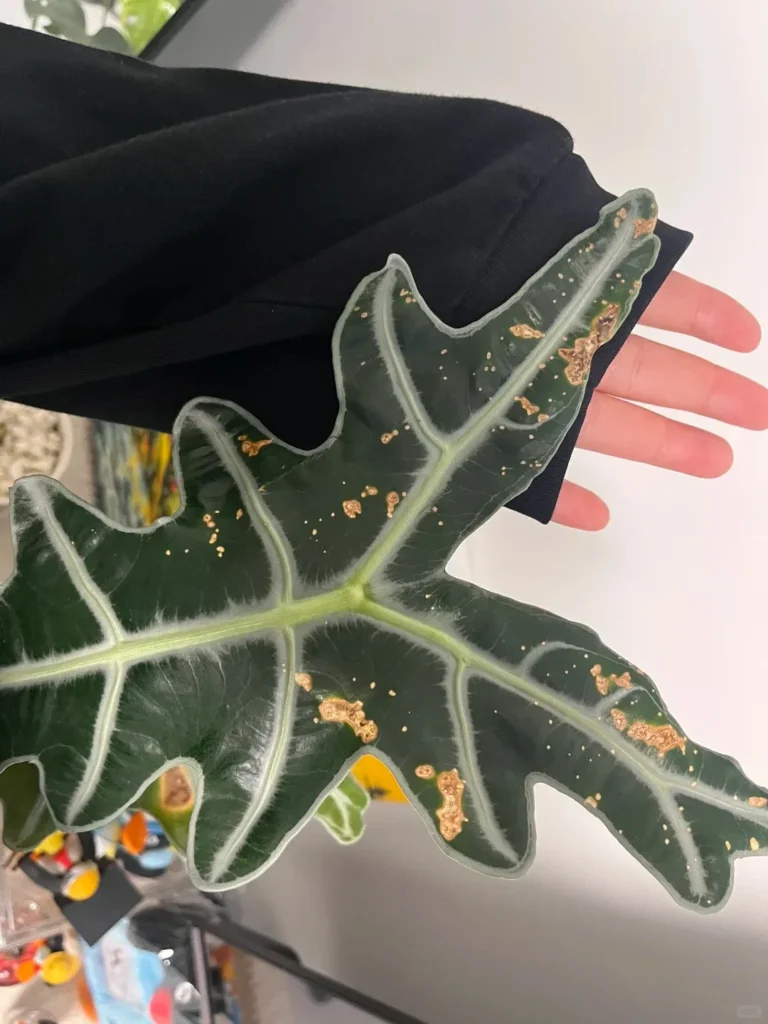
2. Is the spot spreading — or staying exactly the same?
This question alone has saved me from countless wrong decisions.
If a spot is actively spreading, changing shape, or multiplying across the leaf, it usually means something is still happening — a pest feeding or a pathogen progressing.
If it looks ugly but stays the same for days or weeks, it’s often old damage, not an active problem.
I’ve learned to give myself time to observe. Not everything needs to be treated immediately, and not every damaged leaf is an emergency.
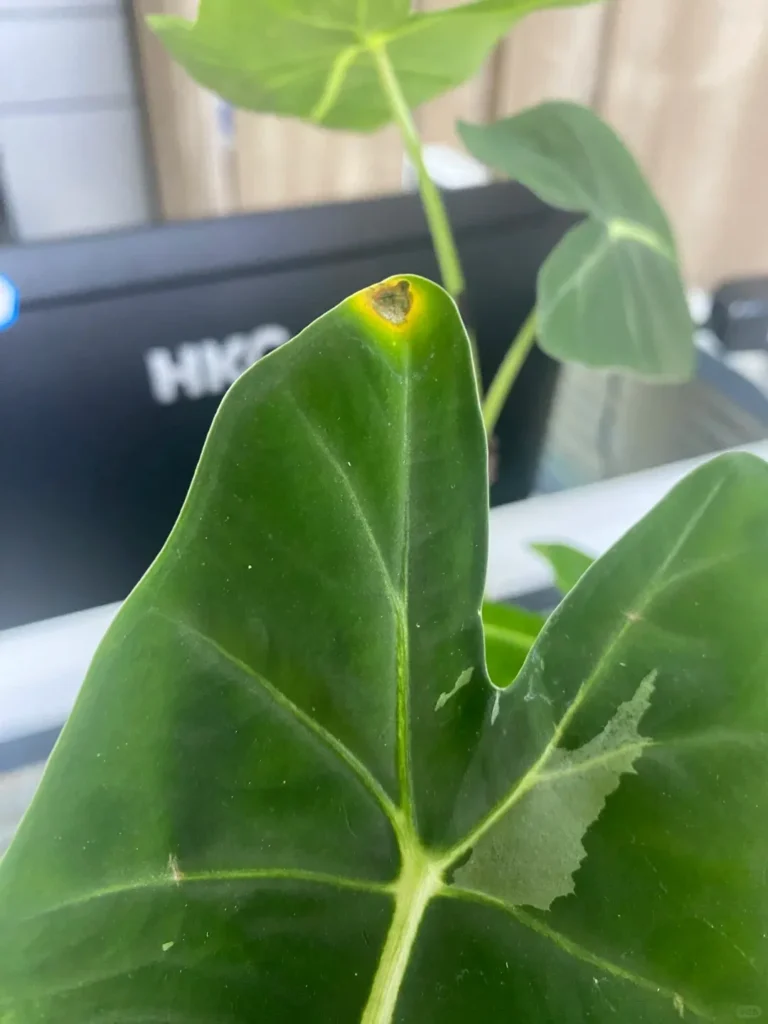
3. What changed recently?
This is the question I ignored the longest — and the one that finally made everything click.
I now think back one or two weeks and ask:
- Was there a heatwave?
- Did I water more frequently?
- Did airflow decrease?
- Did I move the plant closer to a window or a heater?
Almost every serious-looking leaf issue I’ve dealt with could be traced back to a recent change, not a sudden disease appearing out of nowhere. Alocasias are sensitive, and they tend to show stress on their leaves before anything else.
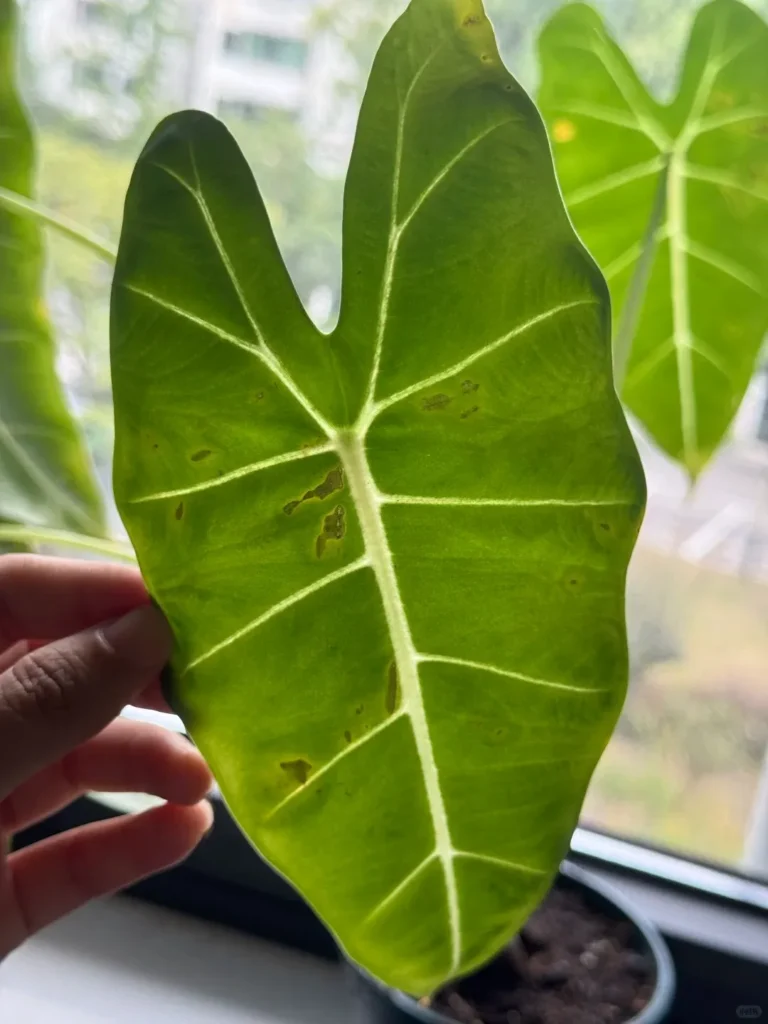
Once I started using these three questions consistently, something important changed. I stopped guessing. I stopped treating symptoms blindly. And most of the time, I realized I didn’t need to “fix” the leaf at all — I needed to understand what the plant was reacting to.
That’s also why the following sections aren’t a random list of problems. They’re patterns I’ve seen repeatedly, each one behaving differently once you know what to look for. If you’re still dialing in the basics, my Alocasia care guide gives the full routine I use.
Type 1: Brown or Black Spots with Yellow or Orange Halos
(Stress-Triggered Fungal Leaf Spot / Anthracnose-Type)
This was the first leaf issue that really confused me — and the one that taught me the most.
What the care conditions looked like at the time
Looking back, the timing wasn’t random at all.
A few things happened close together:
- The weather suddenly turned much hotter
- I watered more frequently than usual
- The plant received stronger light than it was used to
The leaf didn’t fail overnight, but it was clearly under stress. I just didn’t recognize it yet.
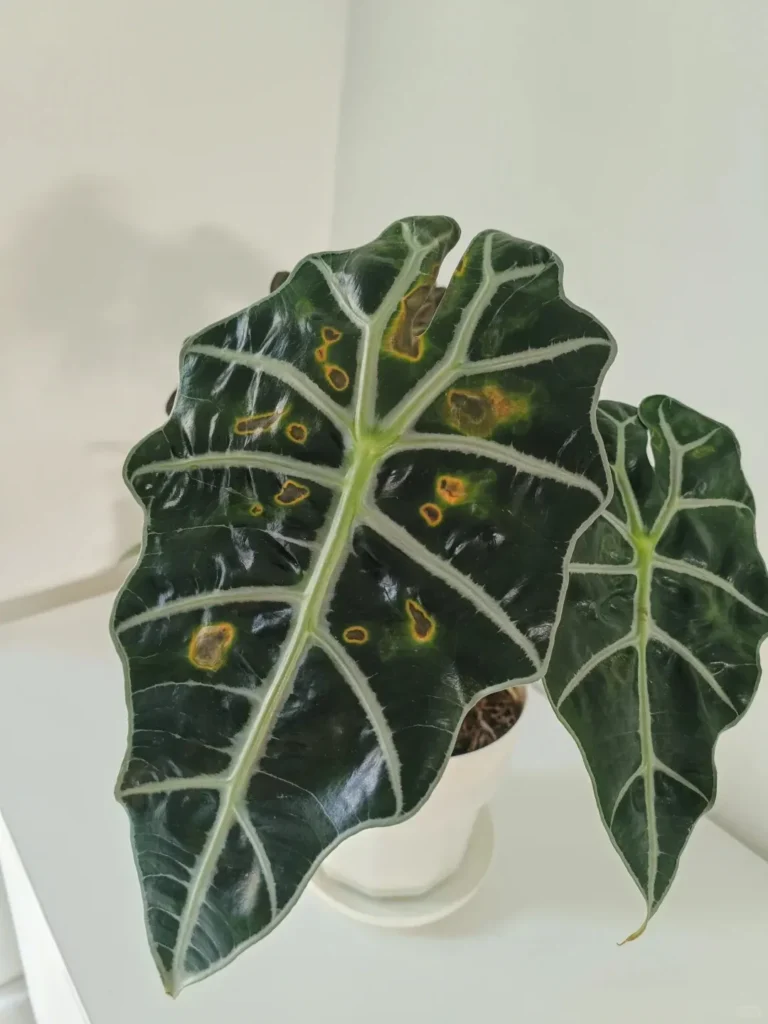
I focus on whether they expand over days — not on how dramatic the color looks at first glance.
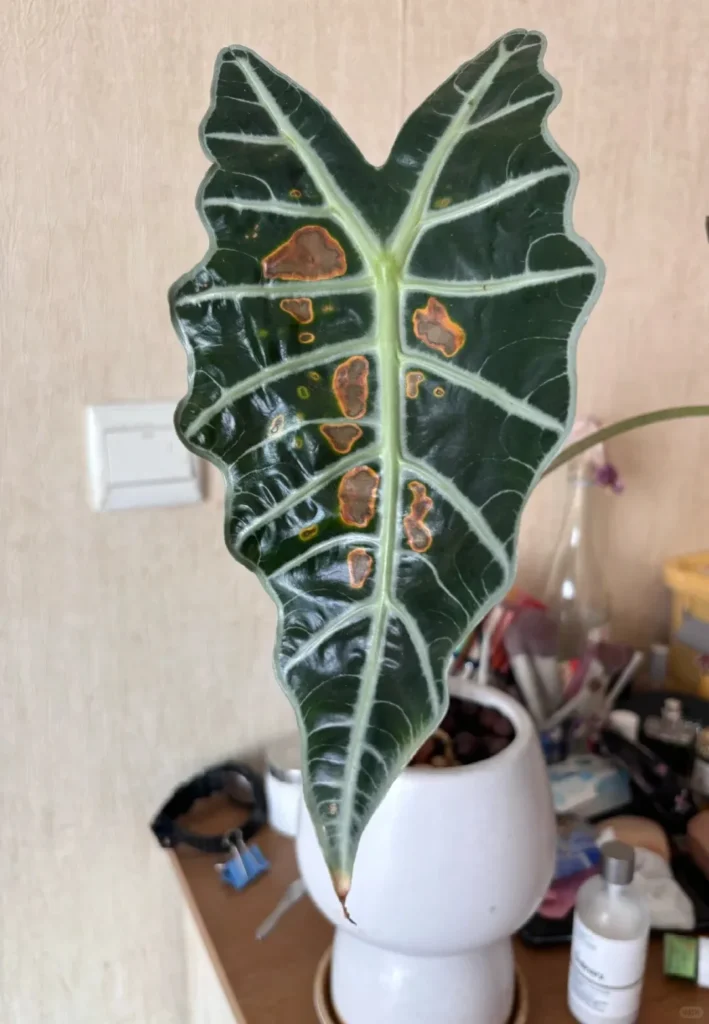
Once lesions merge and the margins turn sharply yellow, the leaf rarely recovers and can drain energy from the plant.
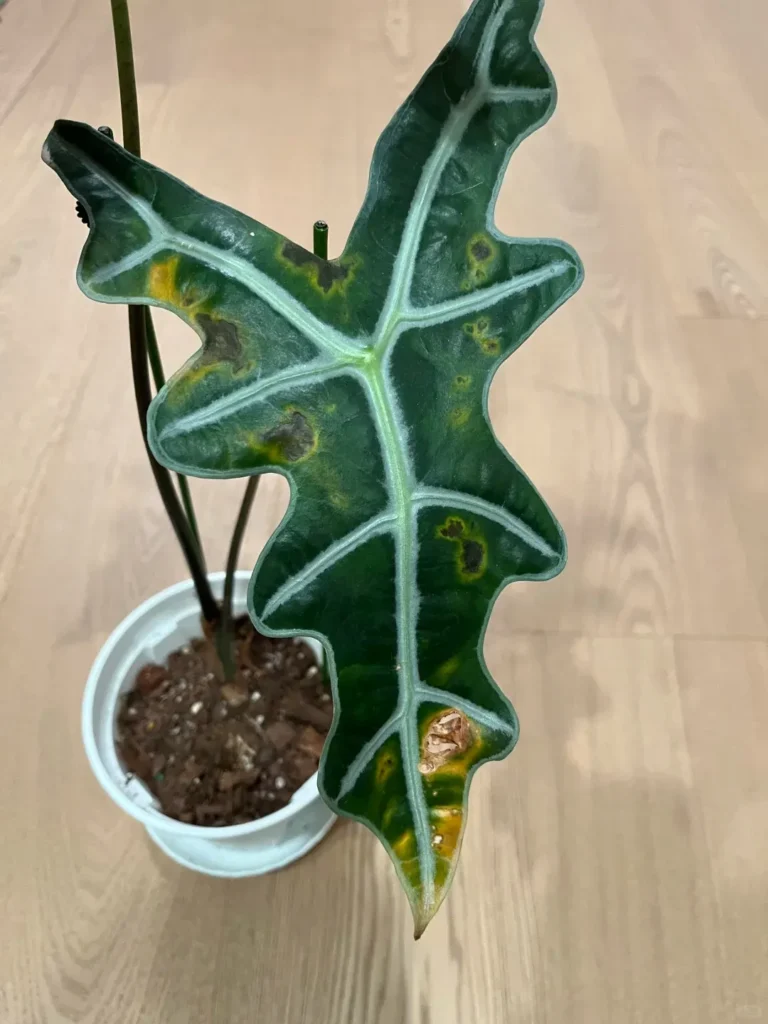
At this stage, improving airflow and watering habits matters more than treating the leaf itself.
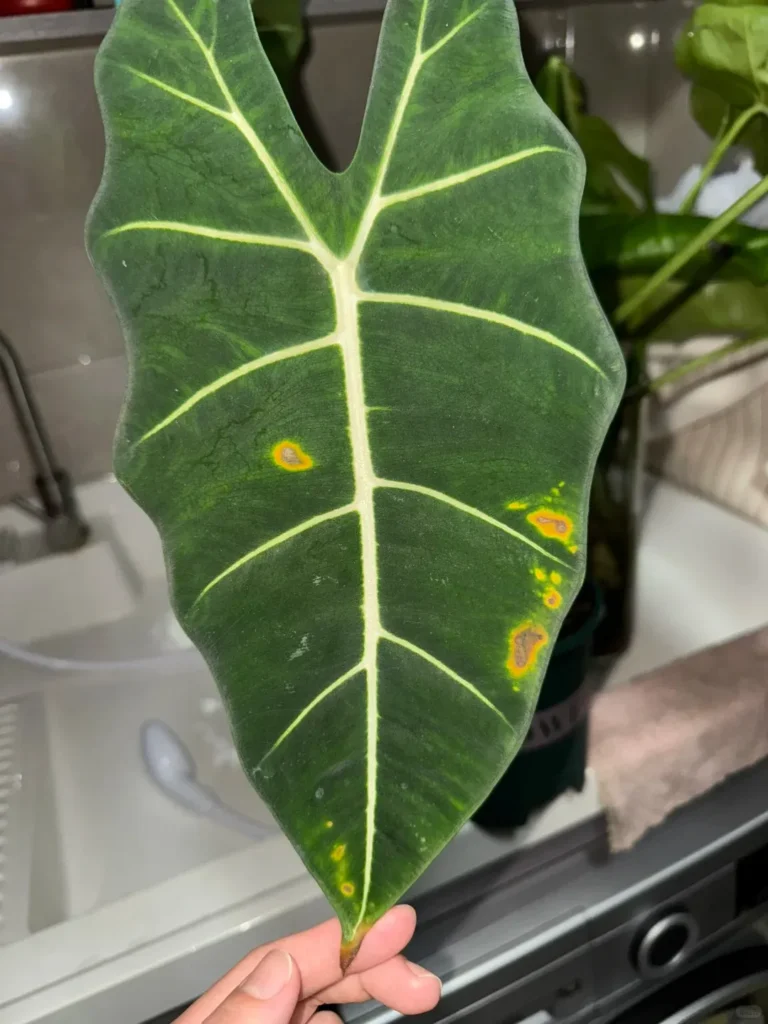
My first — and wrong — assumptions
At first, I blamed sunburn. The spots were dark, and the timing lined up with hotter days.
When the markings didn’t fade, I jumped to a different conclusion: maybe it was anthracnose, or even rust disease.
My immediate reaction was to spray fungicide. I assumed that if it looked like a disease, treating it like one was the safest move.
But something didn’t add up.
What made me slow down and re-evaluate
When I stopped reacting and really looked at the leaf, a few details stood out:
- Each spot had a clearly dead center
- There was a yellow to orange halo around the damaged tissue
- But most importantly — the spots were not actively spreading
Days went by, and the lesions stayed ugly but stable. They didn’t creep across the leaf the way an aggressive infection would.
That’s when I realized I might be dealing with a stress-triggered fungal issue, not a disease that had suddenly appeared on its own.
What actually stopped the damage
What changed the outcome wasn’t stronger chemicals or more treatments.
It was changing the conditions that made the leaf vulnerable in the first place.
I focused on three things instead:
- Letting the soil dry properly instead of keeping it constantly moist
- Improving airflow around the plant
- Stopping any practice that left water sitting on the leaf surface
Once those changes were in place, the situation stabilized. The existing spots didn’t heal — damaged tissue never does — but they stopped progressing.
The result
The biggest confirmation came later.
A new leaf emerged, fully clean.
No yellow marks. No spreading spots. No repeat of the problem.
That’s when I knew I wasn’t dealing with a random outbreak, but with a stressed leaf that had become susceptible under the wrong conditions.
In my case, this wasn’t a disease that appeared out of nowhere —
it was a stressed leaf that became vulnerable.
Why this distinction matters
This type of spotting is often mistaken for “overwatering” or blamed entirely on disease. But in my experience, it’s usually the result of multiple small stresses stacking together — heat, moisture, and airflow — until the leaf can’t defend itself anymore.
Recognizing that difference completely changed how I respond the next time I see similar spots.
Type 2: Tiny White or Yellow Dots That Keep Multiplying
(Thrips Damage Disguised as “Something Else”)
This was the experience that taught me how misleading early pest damage can be — especially when you don’t see any bugs.
What I noticed at first
It started subtly.
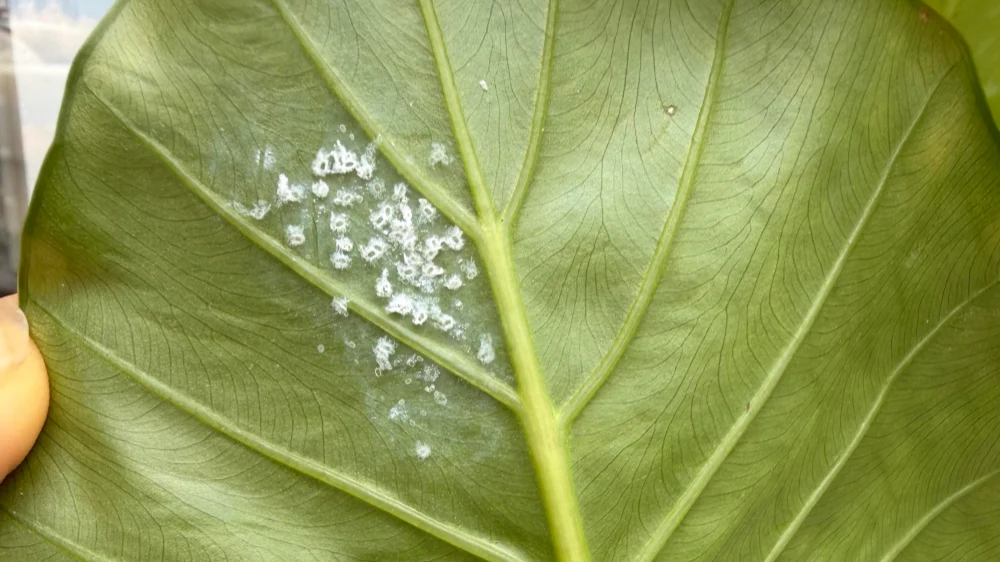
Small white dots appeared across the leaf surface, almost like dust or residue. They were easy to ignore at first, and because I couldn’t see anything crawling on the plant, I assumed it wasn’t a pest problem.
My first guess was spider mites. The spots were pale and scattered, and that explanation felt reasonable — or at least familiar.
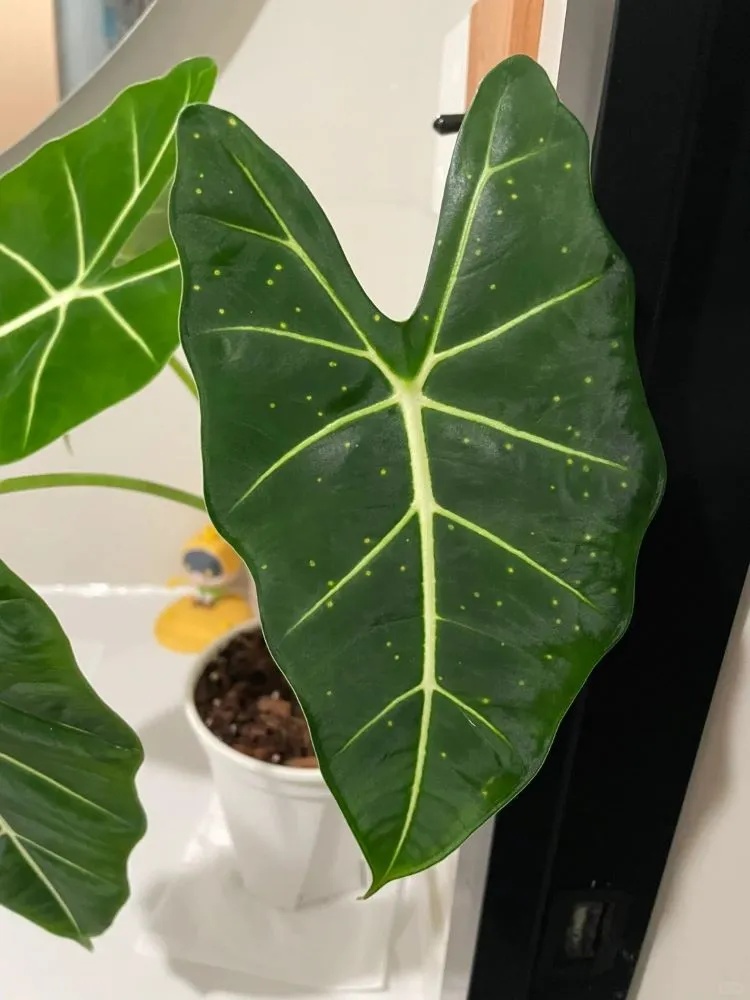
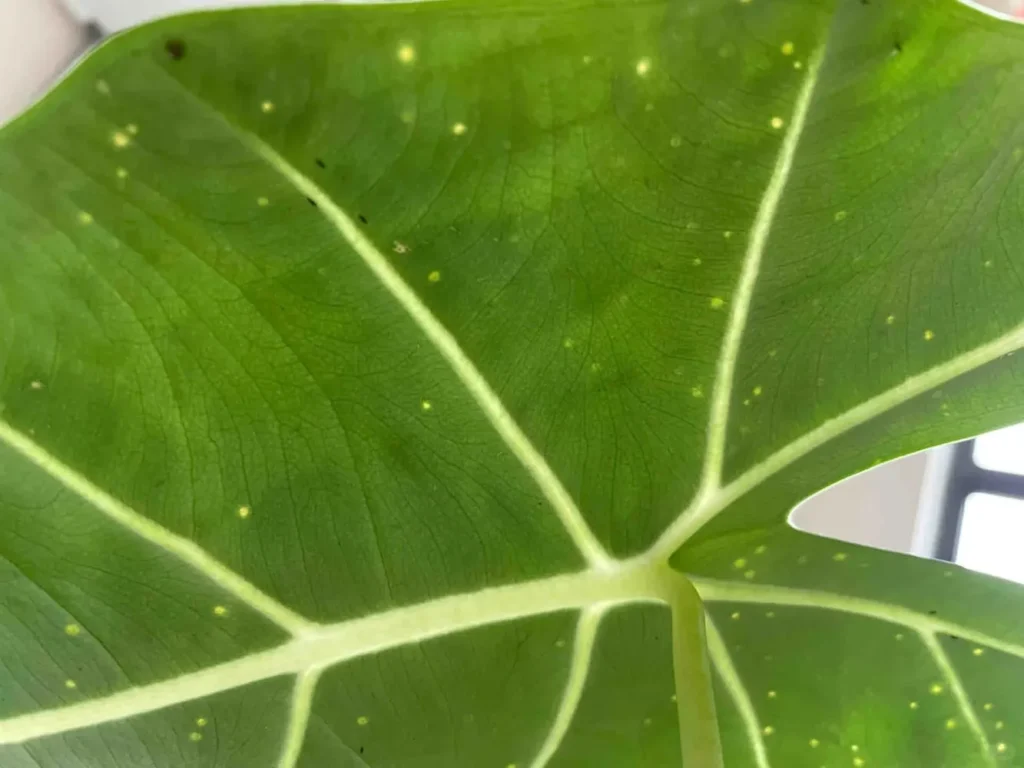
(Place this image group here: readers need to recognize how subtle thrips damage looks in its early stages.)
What I tried — and why it didn’t work
Because I thought I was dealing with something minor, I went for gentle, surface-level fixes:
- Wiping the leaves with alcohol
- Using essential-oil–based treatments
None of it helped.
The dots didn’t fade. They multiplied. New ones appeared on the same leaf, and then on others. That was the moment I realized I wasn’t dealing with residue, stress, or a harmless cosmetic issue.
Something was actively feeding on the plant.
The turning point: checking at night
What finally changed everything was checking the plant after dark.
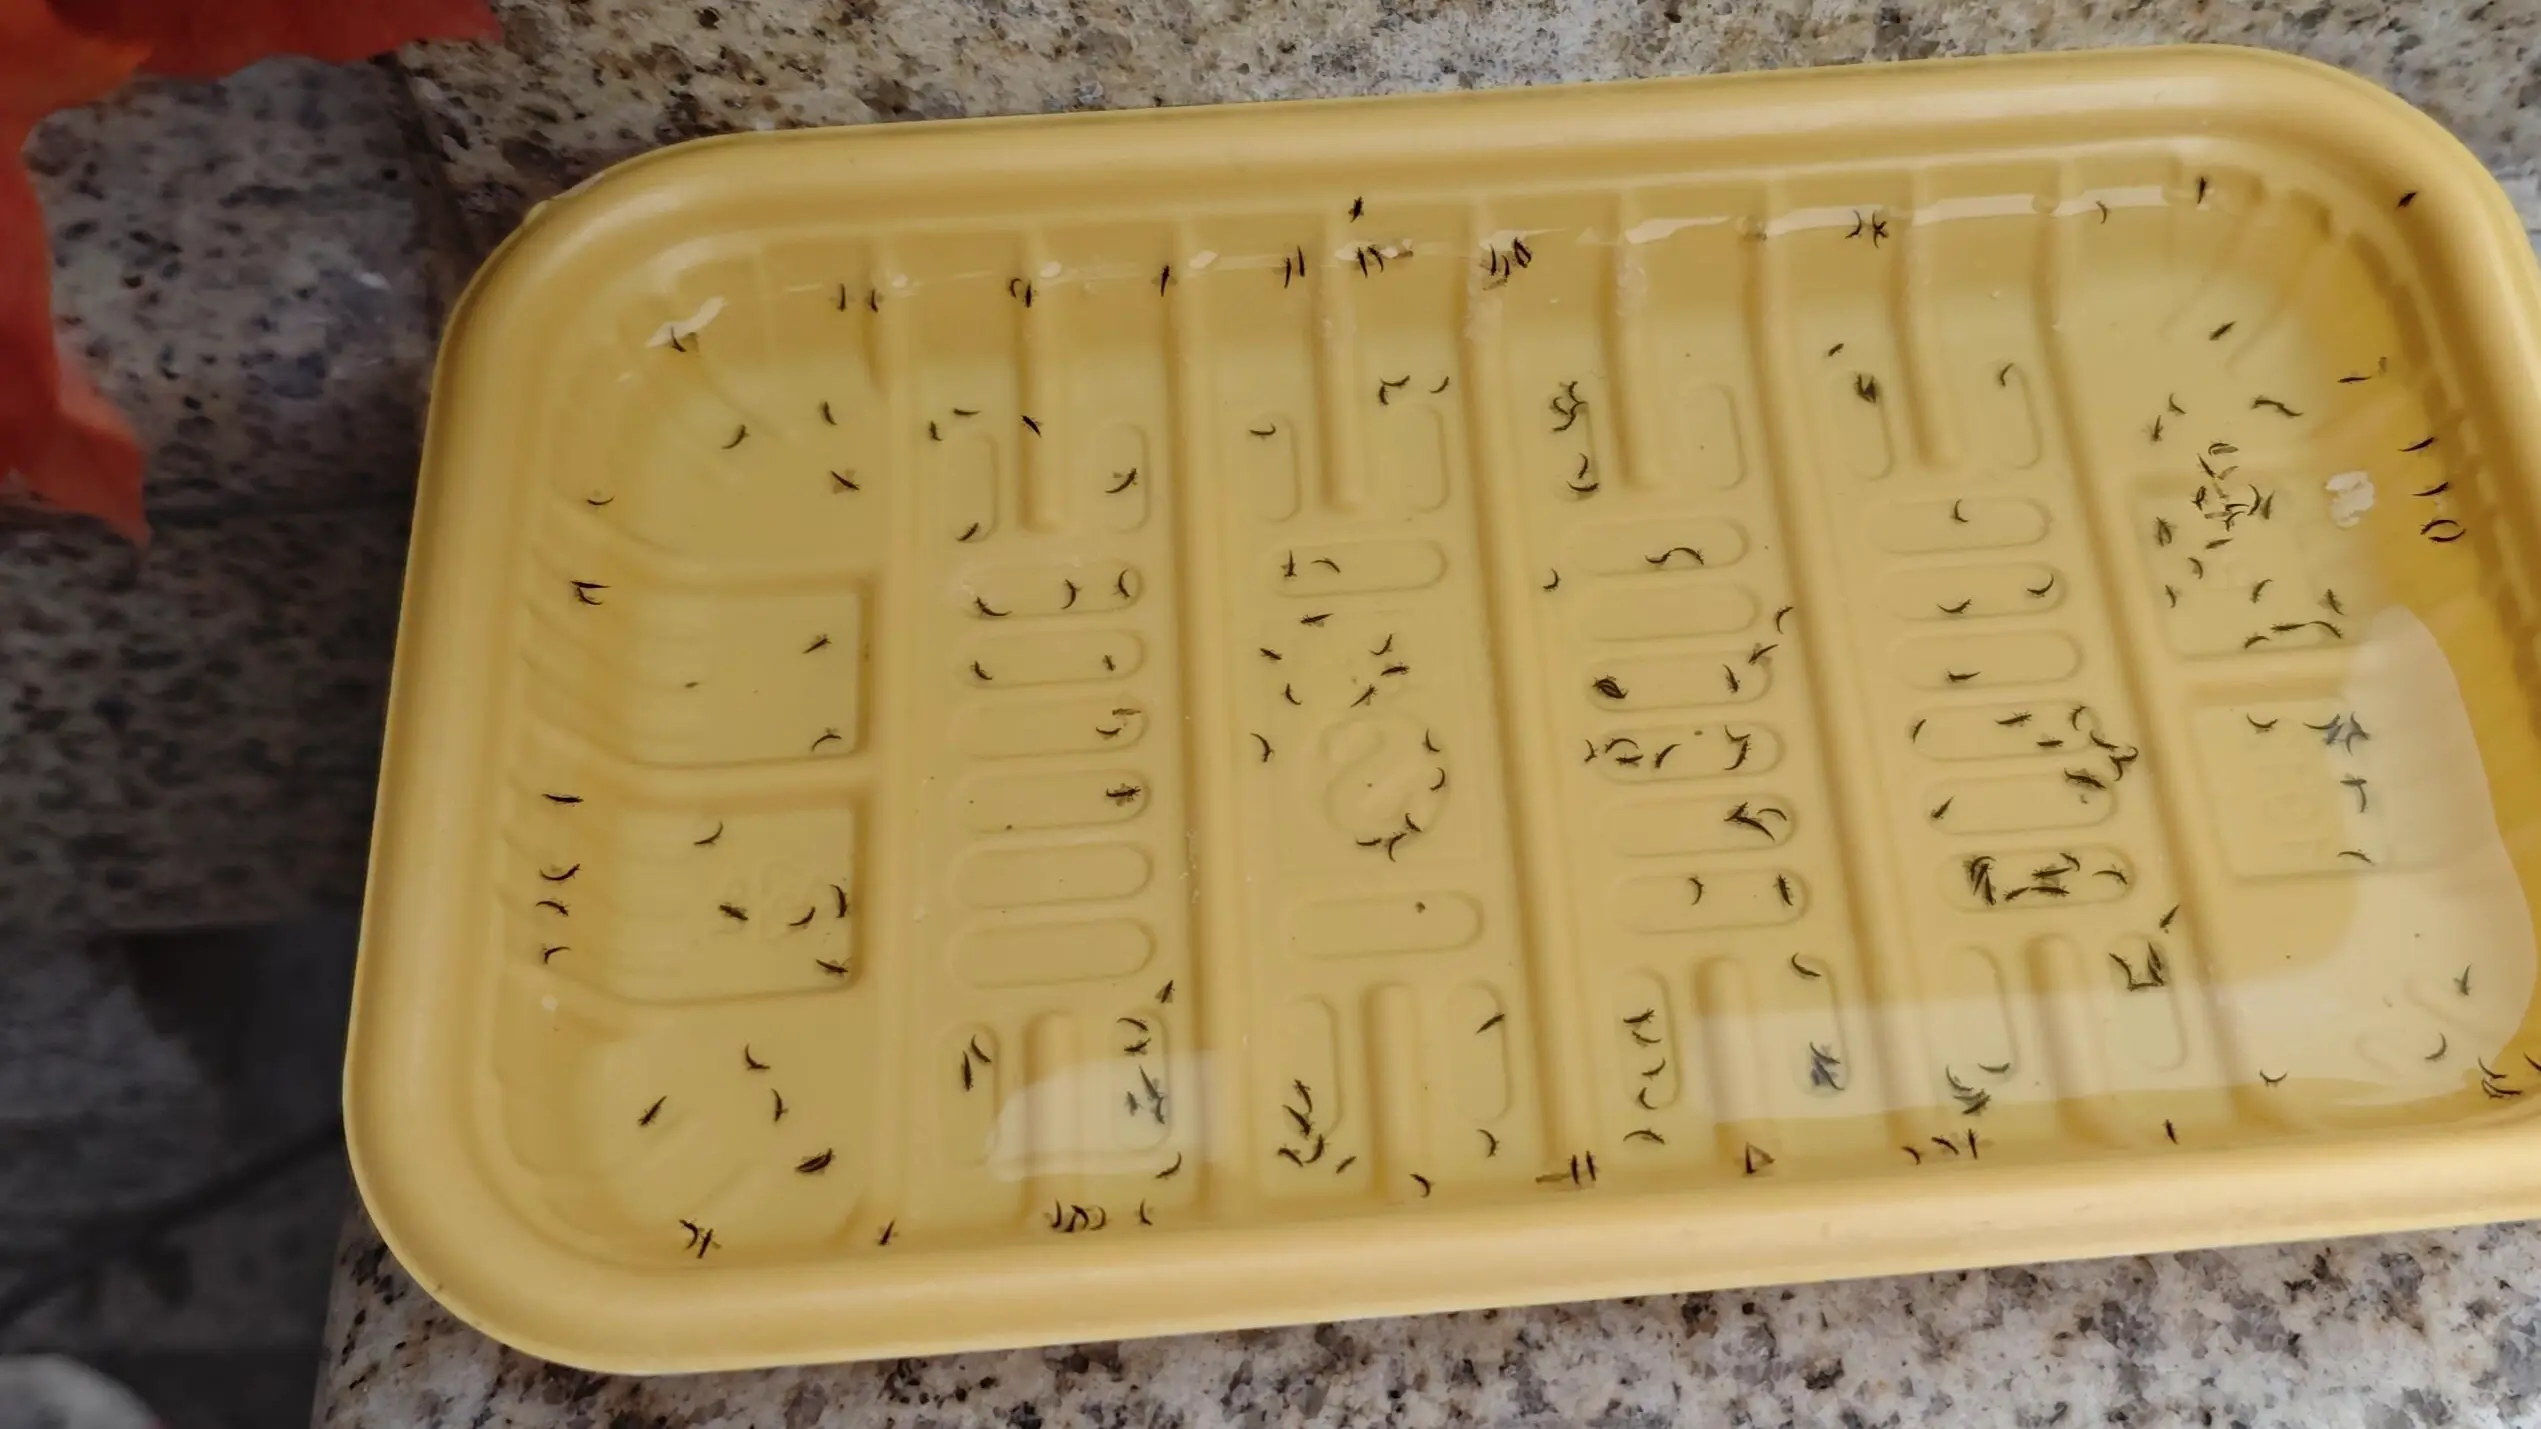
Under low light, I noticed movement — tiny, fast-moving black insects on the leaf surface. Once I saw them, there was no doubt anymore. This wasn’t spider mites. It was thrips.
They had been there the whole time. I just hadn’t been looking at the right moment.
What actually worked
Once I identified the problem correctly, the solution was straightforward.
I used a thrips-specific treatment and followed a proper schedule instead of one-off wiping. The difference was immediate. Within a short time, the spread stopped. New damage didn’t appear, and the plant finally had a chance to recover. If you’re seeing multiple symptoms at once, I keep the most common fixes organized in the Problems Hub.
The existing dots never disappeared — thrips damage leaves permanent scars — but the progression ended, which was all I needed to see.
The lesson I won’t forget
This experience changed how I approach every “mystery spot” now.
The biggest mistake I made was assuming
“no visible bugs” meant “no pests.”
Thrips are easy to miss, especially early on. By the time the damage looks obvious, they’ve often been feeding for a while. And if the leaf starts fading overall (not just dotted), this can overlap with Alocasia leaves turning yellow. Learning that difference saved me from repeating the same mistake again.
Type 3: Dark or Brown Areas That Don’t Spread at All
(Physical or Environmental Damage, Not Disease)
This is the category that took me the longest to trust — mostly because it feels wrong to do nothing when a leaf looks damaged.
What these spots have in common
Over time, I noticed a pattern with certain marks that looked alarming at first but behaved very differently from pests or disease.
These spots:
- Did not expand
- Did not merge into larger patches
- Did not affect new leaves at all
They stayed exactly where they were. Ugly, yes — but inactive.
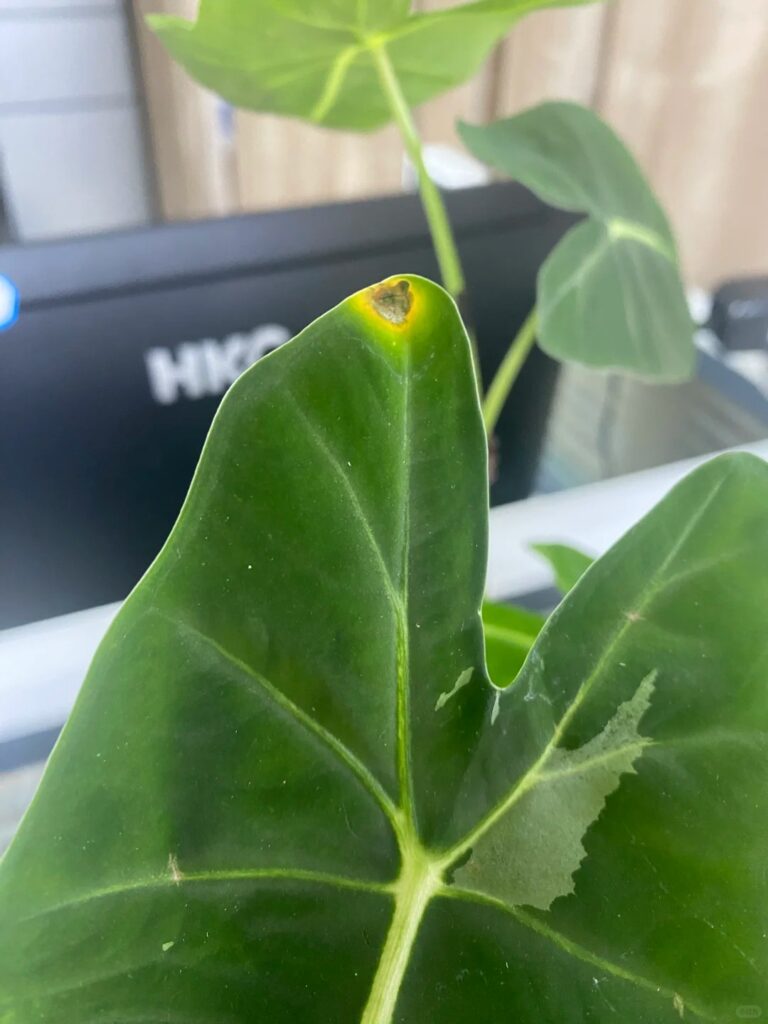
In my experience, this kind of damage often comes from brief dehydration, light fluctuation, or mechanical stress, not infection.
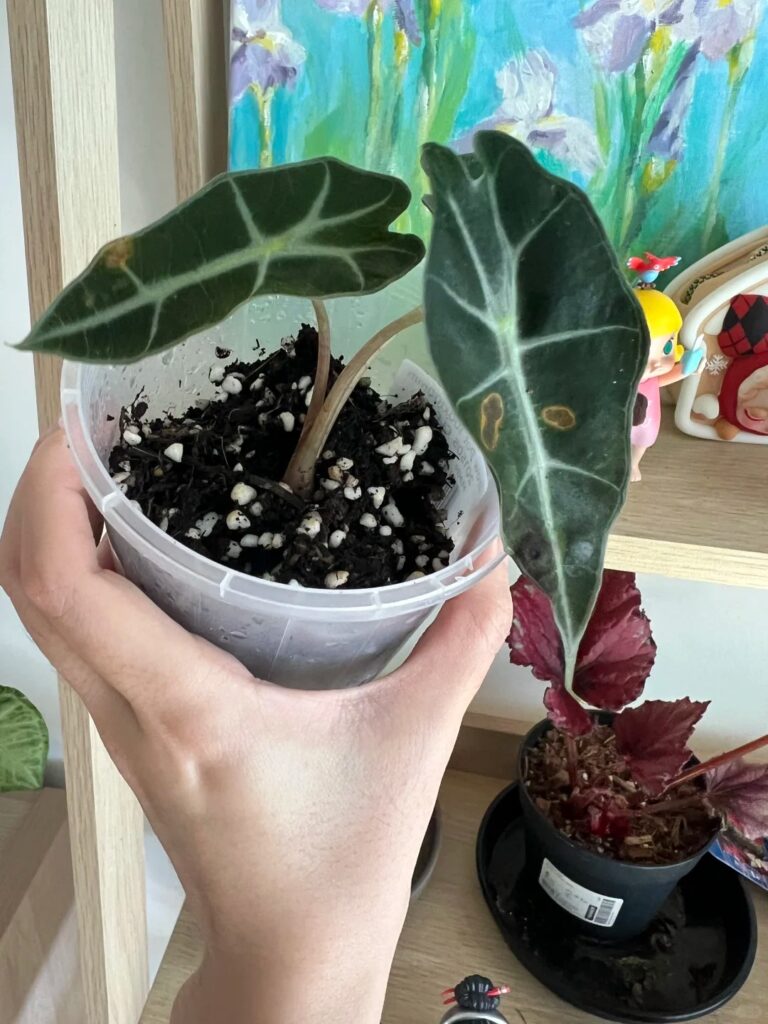
When spots stay isolated and new leaves remain healthy, I usually leave the leaf alone and simply stabilize care conditions.
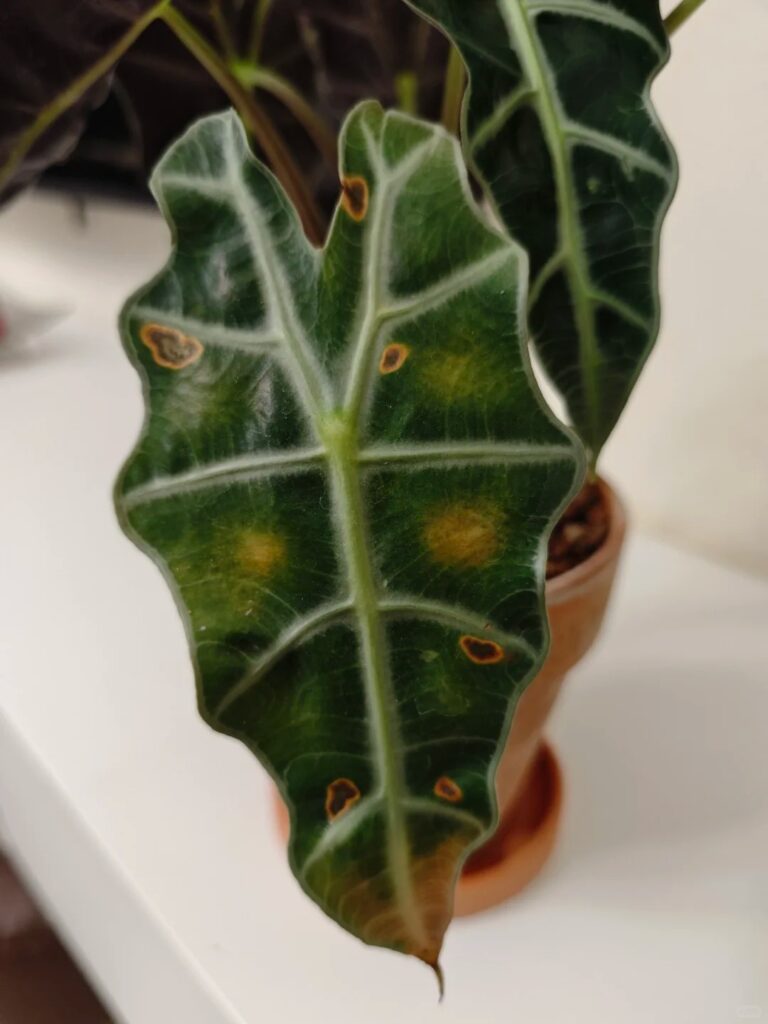
If these marks stay unchanged over time and don’t affect new growth, I treat them as stress scars rather than something to fight.
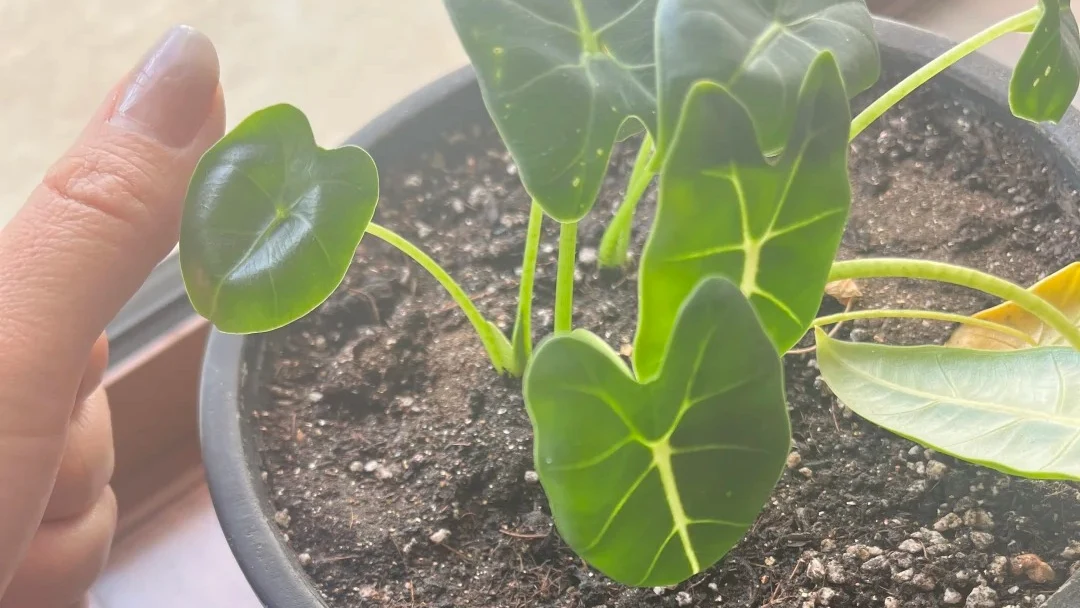
(Place this image group here: readers need to see what “stable, non-spreading damage” actually looks like.)
What they turned out to be — in my experience
Once I stopped assuming every mark was a problem to fix, these cases became much easier to understand.
Most of the time, these spots traced back to physical or environmental stress, such as:
- A sudden increase in light intensity
- Inconsistent watering — too wet, then too dry
- Temperature swings, especially between day and night
When stress shows up as posture change instead of spots, I check my notes on Alocasia leaves drooping.
In other words, the leaf reacted to a change, got damaged, and then… stopped changing.
There was no pathogen advancing. No insect feeding. Just tissue that had already been stressed beyond recovery.
The mistake I used to make
Earlier on, I treated these leaves anyway — fungicides, wipes, even pruning — and none of it improved anything. In some cases, it actually added more stress to a plant that was already trying to stabilize.
What finally worked was restraint.
I focused on keeping conditions steady:
- consistent light
- predictable watering
- decent airflow
And I watched the new growth, not the old damage. Curling is another stress signal that often comes from the same “unstable conditions” pattern — here’s my guide on Alocasia leaves curling causes and fixes.
What happened next
The damaged areas never healed — and I no longer expect them to.
But the plant moved on.
New leaves emerged clean. No repeat marks. No escalation.
That’s when I understood that some leaf damage isn’t a warning sign. It’s simply a record of what the plant went through.
Not every damaged leaf needs to be “treated.”
Some just need time.
Recognizing this category saved me from overreacting — and probably saved more leaves than any spray ever did.
My Personal Checklist — and When I Actually Cut the Leaf
After going through all of these situations more than once, I realized something important:
most damage gets worse after we panic — not before.
So before I touch the plant, grab scissors, or reach for a spray, I run through the same checklist every time.
My checklist before I do anything
- I check if the spot is spreading
Active damage behaves differently from old scars. If nothing is changing, I slow down. - I look for patterns, not colors
Color alone is misleading. Shape, texture, and distribution tell me far more. - I observe at night, not just during the day
Some problems hide in plain sight. Night checks have exposed more pests for me than any magnifying glass. - I adjust airflow and watering first
I’ve learned that many leaf issues stabilize once moisture and air movement are corrected — without any treatment. - I only check the roots after that
Roots matter, but they’re rarely the first clue when the problem is showing up on a single leaf.
This process keeps me from reacting emotionally. It forces me to diagnose instead of guess.
When I cut the leaf — and when I don’t
Cutting a leaf feels decisive, but it’s not always helpful. Over time, I’ve settled on a few simple rules that haven’t failed me yet.
- If fungal damage is actively spreading → I cut
Once a lesion keeps expanding or new halos appear, removing the leaf reduces risk and buys the plant time. - If thrips damage is severe → it depends
If most of the leaf is scarred and still attracting pests, I remove it.
If the infestation is controlled and the leaf is still functional, I leave it. - If the damage is stress-related → I leave it
Stable scars don’t justify removal. I watch new growth instead of punishing old leaves.
Some leaves never recover visually — and that’s fine. A leaf doesn’t have to be perfect to be useful.
FAQ
In my experience, spots on Alocasia leaves can come from very different causes: pests, fungal infections, environmental stress, or physical damage. Some look dramatic but stay stable, while others spread quickly and need action.
That’s why I no longer ask “Is this a disease?” first.
I ask “Is it spreading, and what changed recently?”
Once leaf tissue is damaged — whether by pests, disease, or stress — it doesn’t turn green again. The goal isn’t to “heal” the spot, but to stop new damage from appearing.
What matters far more than the damaged leaf is what happens next.
If new leaves emerge clean, the plant is recovering.
I only remove leaves when:
Fungal damage is actively spreading, or
Pest damage is severe and the leaf no longer serves the plant
If the damage is stable and new growth looks healthy, I usually leave the leaf alone. Cutting too early can add unnecessary stress, especially on plants with only a few leaves.
Many leaf spots are leaf-level problems, not root problems. Overwatering can weaken a plant and make it more vulnerable, but it doesn’t automatically cause spots like yellow halos or tiny white dots.
That’s why I treat roots as a later checkpoint, not the first explanation, unless the whole plant looks unwell.
Pest damage usually appears as tiny dots or scars that multiply over time
Fungal leaf spots tend to have defined lesions, often with halos, and may expand outward
If I’m unsure, I check the plant at night. That single habit has helped me identify pests far more reliably than daytime inspections.
If none of the patterns here fit what you’re seeing, the issue is often systemic, involving roots, water quality, nutrition, or long-term environmental imbalance rather than a leaf-specific problem.
In those cases, treating spots directly rarely helps. Stepping back and stabilizing overall care usually does.
Trouble with your Alocasia?
Find real fixes for yellow leaves, drooping stems, and root issues in our Problems Hub.
Go to Problems Hub →